Bank
This section captures the employer's bank details so that employees can be electronically paid.
Moorepay will send BACs on your behalf if you have registered with BACs and provided the details.
Prerequisites
Rules and Guidelines
- Fields that are marked with red asterisks (*) are mandatory.
Field Information
These fields display the employee's name.
Choose the method of paying the employee's net pay.
If the system is not transferring money to your employees through BACs, then select 'Cheque'.
The valid options are:
- BACS - Employee paid via BACS
- BACS via Building Society - Employee paid via BACS via a building society (a Building Society Roll Number must be entered if selected)
- Cash - Employee paid by cash
- Cheque - Employee paid by cheque
This is the employees bank account number and is only required if you are paying through BACs.
The entry must be eight-digit numeric; if the account number is less than eight, please precede it with leading zeros. For example, instead of '123456', enter '00123456'.
Enter the employer's sort code.
We hold a list of all the bank sort codes in the UK. Selecting the relevant bank sort code enables you to be sure that you are transferring money to a valid UK bank account.
The Bank Identifier Code (BIC) is needed when UK adopts SEPA (Single European Payment Area). This also enables payment to international banks.
The International Bank Account Number (IBAN) is needed when the UK adopts SEPA (Single European Payment Area). This also enables payment to international banks.
The employee's name is entered by default but this can be overwritten.
This refers to the name of the bank account holder that the payment will be transferred to.
The Building Society Roll Name is an alpha-numeric field used for BACS if the employee's net pay is to be paid to a building society account.
Link
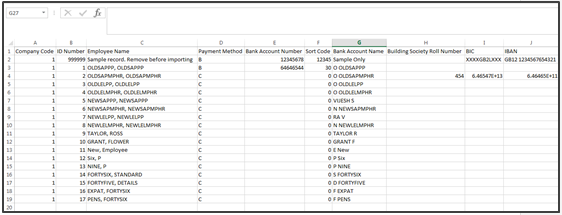
If you would rather import the data from a spreadsheet, you can download our template by selecting this link. If it is the first time you have added any data, then a dummy row will be displayed to help you. If you already have data, then that data will be downloaded to enable you to update it as well as add new data. You will need to remove the dummy data entered in the spreadsheet before import.
Although the file will open in Excel, it is important that it is saved as a CSV (Comma Separated Values) file. Otherwise, the import will not be completed.

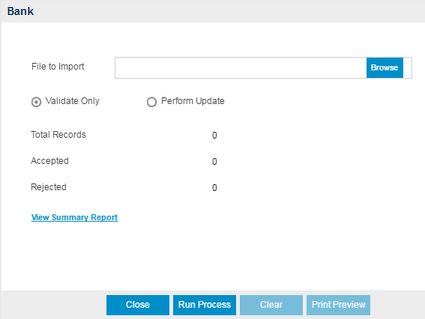
Upload will allow you to browse to the downloaded file and bring it in to the system.

You can either perform a validation or update the system once the file is located using the Browse option.
- Validate will advise you if you have any issue with the file before importing, enabling you to change the data. Select this option to test the format of the file and fields.
After running the Validate Only process, the system will produce a report detailing that the update is completed, and if there were errors encountered during the validation.
- Perform Update will upload the data and display it in the Bank page of the Wizard for you to confirm by moving Next. Select this option to upload and update information in your database.
Select Next >> to continue with the workflow or Select Back >> to return.
Click this link --> Setup Wizard if you want to go to the Wizard's Help.